Wednesday, May 16, 2012

Straightening the Magic Rabbit - part 2


You asked for it, lights back on and "new" bumper!!

New bumper, off of Car 3, has bump absorbing springs in the mount, will compress and take care of the 5 mph crash. Like we would every have one of those. But maybe it would help is someone is braking and sliding into us.

Also fired up Cabby 3 and took it for a spin to test out it's tranny. That tranny will be going into the race car, worked nicely and it's a close ratio tranny. Here are pics of Paul and I top down, joyriding around Redwood Estates!! Rye snapped the second pic for us.


Also got the old tranny out of the race car and here is a pic of the hole (center of the pic) the loose rivet ate in the tranny case and let all the oil out onto the clutch!!


Straightening the Magic Rabbit


So, the 4 ton Porto Power wasn't strong enough, so a trip to Harbor Freight and scored a 10 ton Porto Power (more Power!!!) then things moved like a hot knife through butter!
But then the last 3/4 inch required MORE POWER, so hook up the Infiniti, chain the Rabbit to the concrete step and slam that car a few times....looks good!

check out the pics, first one is using 10Ton Porto power


Left side chained to the concrete step, right side hooked to the Infiniti, HIT IT! Both the Infiniti and my concrete step survived, Magic Rabbit now straight!!!
Now some fine tuning of the tail end, getting ready for new tail light!


Here is how it looks at 6pm, cocktail time!!

Monday, February 20, 2012

Removing engine and tranny from Mk2 parts car


After some research I realized that the transmissions in Mk1 and Mk2 cars are the same all called 020 transmissions. So DDR has a silver Mk2 just sitting doing nothing, so I decided it was time to remove the engine and transmission. Nancy helped my move the Mk2, chained it up to the Infiniti FX and dragged it up the hill and around the dirt road to get it headed downhill. Then I got in it and coasted down to the garage, thankfully the brakes still work well enough to keep me from going too fast!


Then I started stripping down all the accessories, wires, connections, front bumper, battery, grill, etc. I had heard from some Lemon's guys that the Mk2 was much easier to work on and get the engine and tranny out. Boy! They are so right! The entire front end of the car can be unbolted giving you total access to the engine and transmission. Here is the teardown midway through.


Then I got the Mk2 into the garage after dinner in just a couple of hours it looked like this:

The front end is totally open and the engine mounts are so easy to get to, so much easier than the Mk1. Makes me think maybe we should be racing the Mk2! But it is heavier than the Mk1.

OK a few bolts holding the engine mounts and it is free, just pull it out the front, not drop it to the ground and drag it under the front bumper like you have to do with the Mk1.


OK, tomorrow I will take the transmission off. I checked the transmission code, it is a 9A which means its a close ratio GTI gearbox, so should be good for Infineon more acceleration out of turn 9 after we out-brake everyone! Cross you fingers that the transmission is good on the inside, probably won't know for sure until we get it in the car and do some test laps. One more pic, hanging from the engine hoist, ready for me to take the tranny off the engine:

Saturday, February 18, 2012

GTI transmission teardown Part 3


The Fernley transmission teardown and CIS-Pine Trail forensics continues. While taking it apart a large metal piece fell out, big puzzle, where could this have come from? A very big, very unusual shape. That was about two weeks ago. Today I was throwing out the rusty useless extra transmission that I picked up for free when I bought the Morgan Hill GTI. I was about to throw out the shift linkage input shaft when the light bulb went on in my head. Pow!

Hey, wait a minute, those two tabs look like the piece of steel that fell out of the Fernley transmission. Hmmmm, so I took the rusty piece over to the bench and then got the same piece from the Fernley tranny. Yep, another puzzle solved. We broke off the tab from the shift input lever. How did we do that? I suspect it may have happened when we where pulling very hard on the shift linkage trying to get the transmission out of being stuck in third gear on Friday practice before the 24 hour race. 

Here is a picture of the two mechanisms, the rusty one on top with its compliment of two tabs, one on each side. Then look at the bottom mechanism from the Fernley tranny, left side tab is missing and that broke piece is pictured just below on the work bench. That broken piece bounced around inside the tranny during the 24 hour race but I could only find one place where it did a little damage to the transmission case. It got hit by the ring gear of the differential and gouged a little material right next to the pinion gear bearing, but not a fatal gouge. 


Friday, February 10, 2012

GTI transmission teardown Part 2


I was able to spend some more time on the Fernley transmission. First had to fabricate a two more tools to use to support the output shaft while pulling off the transmission case and they worked!

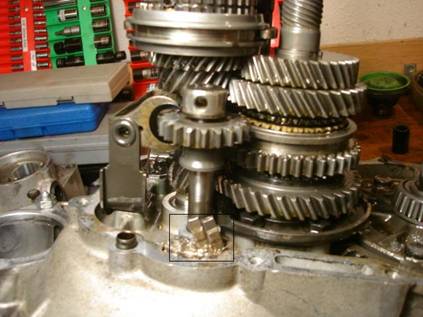
As I said before, there is grounded up brass everywhere. Well, as soon as I got the case off it all become very clear! Take a close look at this picture:
Those two little blocks sitting inside the black square at the bottom of the page don’t belong there! First it explains everything at Fernley. During practice we got stuck in third gear. Couldn’t get it out of gear, but then Rye took it out on the track and at high revs suddenly it slides out of gear and we thought everything was good.

Well, what happened was those little blocks belong behind that smooth large ring at the top of the picture. They had shifted out of place and caused us to be stuck in third gear. But then at high revs those blocks, actually there are three of them, were spinning fast enough that they spit themselves right out of the gear cluster. And those little blocks have an important job! They keep the brass syncro ring aligned with the sliding collar. Without them everything for third and fourth gears are screwed. So every time we shifted between the two gears we had to grind on the brass syncro ring to get the shift collar to align. There are little dog house looking teeth on the brass syncro rings, you can just barely see them on the right side gear cluster. They have to align with the steel dog houses, again you can see them just above the brass ring on the right side. So without the three little blocks, every time we shifted the brass ring dog houses were grinding up against the steel dog houses. Guess who lost that battle! Yep, there are NO little dog houses left on the third gear syncro rings, totally gone!

Again, look at the black square at the bottom, all that gunk underneath those two blocks looks like gold, well it’s loads of ground up brass. It’s everywhere!

So now we know why the Fernley transmission “fixed itself” on the race track. And also why as the race wore on the grinding got worse and worse. Also explains why doing “Granny shifts” worked, it gave the gears time to match up without the benefit of the syncro ring.

I got the first shaft out of the case, here it is on the bench.
Sorry it’s a little out of focus, bit the brass ring on the right is the third gear syncro with all the “dog houses” gone, those steel “dog houses” just to the right of the brass ring eat them up! The brass syncro on the left is fourth gear, they are chewed up too, but not totally gone. And this has some logic too. Remember, this gearbox is not a close ratio box, so we were not needing 5th gear at all, too tall. So we where only getting into fourth gear. When you shift up your rpms fall, so things are spinning a little slower, easier to get the “dog houses” to line up, so less grinding. But down shifting to third, you need to have things spin faster and that is harder to do, therefore more grinding on those brass “dog houses” to get third gear up to speed. Here is where double clutching REALLY helps, gets those gears spinning faster before trying to shift into third.

As you can see, I am thoroughly enjoying my new skill, VW 020 transmission forensic engineer!

Next question that needs to be answered, other than the brass syncro rings, how much other work do we want to do on this tranny. I say do the minimum, reuse as many of the bearings as we can, so just replace syncros, oil seals and snap rings, put it back together. What could possibly go wrong!!?? Run it! Now, the other tranny, let’s call it by it’s designation, the FK tranny, is a close ratio transmission. Now that I want to get into and I think that is the one we want to use most. However, the Fernley transmission might be the best choice for tracks with a long straight like Thunderhill and Buttonwillow. So what will we have, just the opposite for Infineon, the taller geared Fernley tranny! Oh well.

And that’s your transmission lesson for the day!

Mr. Unruly


Wednesday, February 8, 2012

GTI transmission teardown


I started the teardown of the Fernley transmission, loads and loads of brass filings everywhere. Those syncro rings are gone!  Which confirms all the grinding at the Fernley race. Also I piece of metal fell out, looks like part of the shift levers, but I don't know what it is yet. Maybe something related to the stuck in 3rd gear problem during practice at Fernley. 

Also, there is play in the output shaft bearings, so those will need to be replaced. Got fifth gear housing and gears out, fabricated two special tools....that was fun. So far everything going per the book. 

I did check the gear ratios for this tranny, it's not a close ratio tranny like the one in the car now. So we will use 2,3 and 4th mostly, instead of 3, 4 and 5th like was have been. But we might get a higher top end by hitting 5th at Thunderhill and Buttonwillow!

That's all for now, time for bed.

Mr. Unruly